
First-time setup (onboarding)
How to do it
You are asked five short questions.
- "What's your business called?" Enter the name customers know you by, and choose your business type: Restaurant, Salon & Spa, Clinic, Gym or Other.
- "Where are you based?" Add each of your branches. A QR code is created for each one.
- "Are you on Google Business?" Add your Google review link so happy customers are sent to leave a review.
- "Let's connect your WhatsApp." Connect a new WhatsApp Business number, link an existing WhatsApp Business App number, or enter credentials by hand.
- "Who gets the alerts?" Enter the phone number (with country code, no plus sign or spaces) that should be told straight away when a customer gives bad feedback, and optionally an email address.
What it does
Creates your business, its branches and its WhatsApp connection so the AI receptionist can start answering.
Use cases
Day one for a new salon or clinic.
Workaround for
Asking a developer or agency to set up WhatsApp for you.
Side effects
- A QR code is created for each branch (used for feedback and loyalty).
- Alerts for bad feedback go to the number you enter in step 5.
- Your business type decides some labels. For example, restaurants see Menu and Tables; salons see Services and Staff.
Limits and gotchas
- Keep your WhatsApp access token private. You can change the alert number later in Settings → AI & Conversations.
The Dashboard
How to do it
- Sign in and open Dashboard.
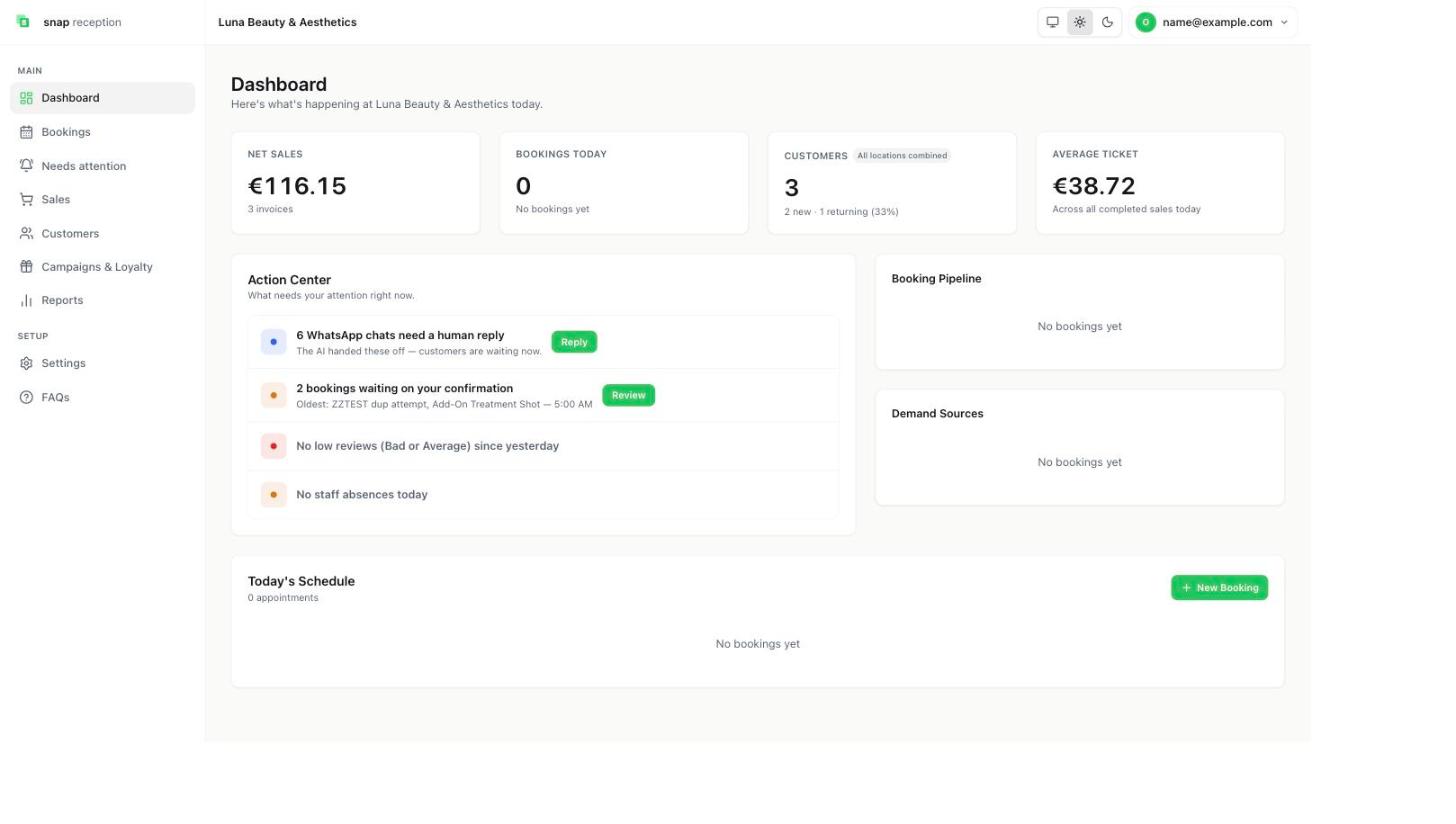
- Read the four cards at the top: Net sales, Bookings today, Customers and Average ticket.
- Read the Action Center for what needs you right now, and click Reply or Review to act.
What it does
- Net sales and Average ticket summarise today's completed sales (the example shows 3 invoices).
- Customers counts customers across all your locations, split into new and returning.
- Action Center lists what needs attention. In the example: 6 WhatsApp chats need a human reply, 2 bookings waiting on your confirmation, No low reviews (Bad or Average) since yesterday and No staff absences today.
- Booking Pipeline shows bookings by status; Demand Sources shows where bookings came from (for example WhatsApp or website).
- Today's Schedule lists today's appointments, with New Booking.
Use cases
A two-minute check at opening and closing time.
Workaround for
Opening five different apps to see what's happening.
Side effects
Viewing changes nothing.
Limits and gotchas
- The Dashboard is an Owner-only permission by default. Give it to a manager or receptionist in Roles if they should see it.
- "Bookings waiting on your confirmation" are pending bookings. See the Bookings guide.
Moving around
How to do it
- On a computer, use the menu on the left. Main has Dashboard, Bookings, Needs attention, Sales, Customers, Campaigns & Loyalty and Reports. Setup has Settings and FAQs.
- On a phone, the same items appear in a bar at the bottom of the screen.
- The light, dark or system theme switch and your account menu are top-right.
What it does
Shows only what your role is allowed to open. A receptionist may not see Settings; an owner sees everything.
Side effects and limits
- Bookings, Needs attention and Sales appear only when the booking system is switched on for your business.
- Some old addresses simply send you to the new place. For example, the old Team page opens Settings → Team & Access.
Team members
How to do it
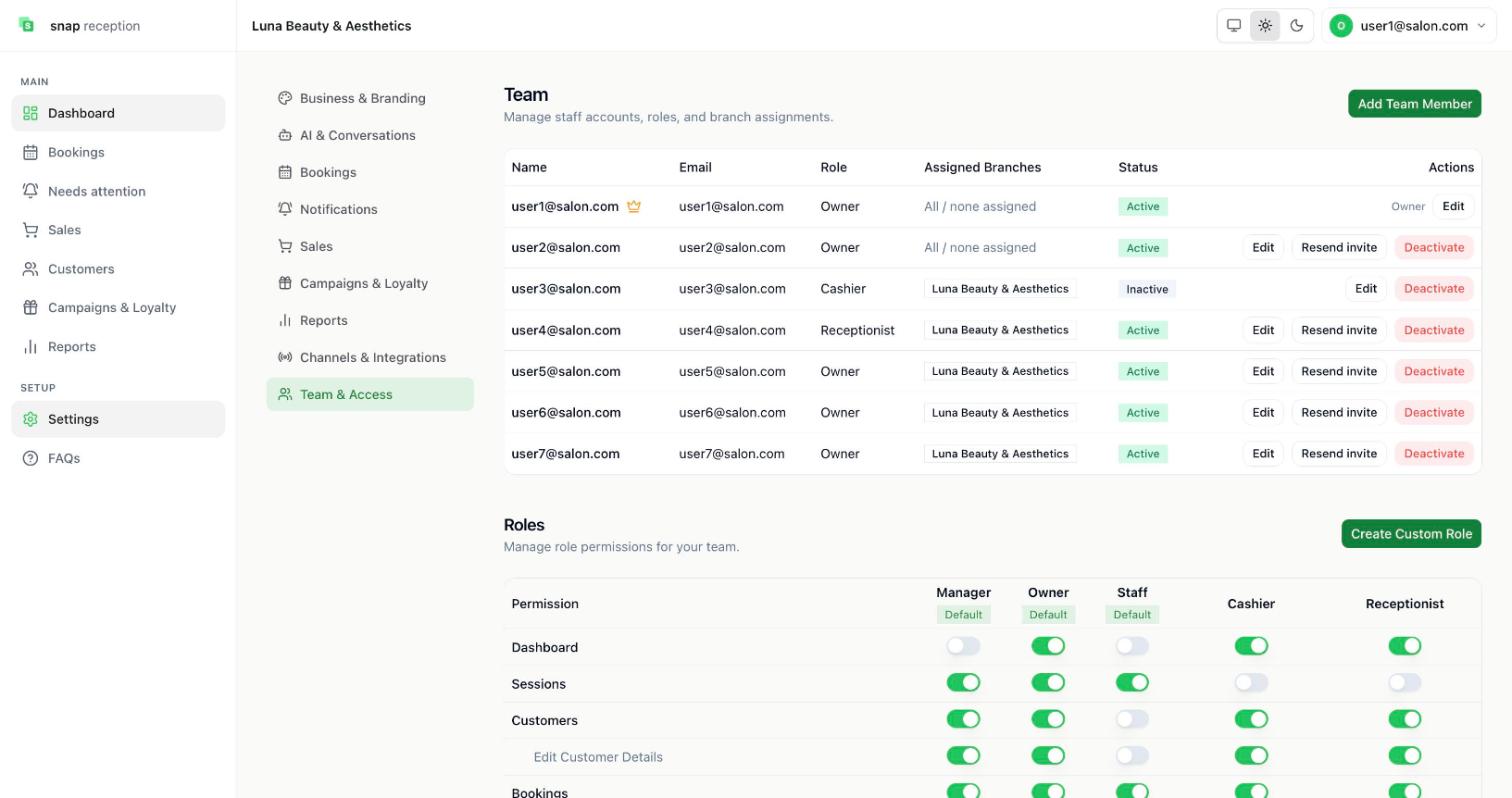
- Open Settings → Team & Access.
- Press Add Team Member and enter their details and role.
- On each person, you can Edit, Resend invite or Deactivate. The branch column shows which branches they can use.
What it does
Creates a login for each person with a role. Your own row is marked with a crown and shows Owner.
Use cases
A new receptionist; a manager for one branch; removing someone who left.
Workaround for
Sharing one login between everyone, so nobody knows who did what.
Side effects
- Deactivate stops them logging in and shows the status Inactive.
- Actions in the system are tied to the person who did them, such as refunds and overbooking reasons.
- Resend invite sends the invitation to that person again.
Limits and gotchas
- Give each person their own login.
Roles and permissions
How to do it
- In Settings → Team & Access, scroll to Roles.
- Each column is a role (Manager, Owner, Staff are the defaults; you can add your own, such as Cashier or Receptionist). Each row is a permission with an on/off switch.
- Switch permissions on or off, or press Create Custom Role.
- A few permissions sit under another one, for example Edit Customer Details under Customers. Turning the parent off turns its children off.
What it does
Controls what each person can see and do. The Owner always has every permission.
Who can do what by default
| Permission | Default for a new role |
|---|---|
| Sales (ring up a sale) | On for every role |
| Change a payment method on a sale | On for every role |
| Overbook, edit services in a booking | On for roles that have Booking System |
| Booking alerts | On for front-desk and manager-type roles; off for calendar-only roles |
| Edit customer details | Follows Customers |
| Loyalty | On |
| Dashboard | Owner only |
| Refunds, Cash Drawer, Discounts and open items, Change item prices, Advance invoices | Owner only |
| Credit (set limits, sell on credit, receive payments, edit/void settlements, reports) | Owner only; any can be granted to any role |
| Merge duplicate customers, Restore a merge, Alternate numbers | Owner only |
| Catalog management (prices and staff) | Owner, or any role that already has Settings |
| Loyalty program settings | Owner |
Use cases
A receptionist who can book and sell but not refund; a manager who can refund but not edit roles; a stylist who sees only their own calendar.
Workaround for
Telling staff "please don't touch that" and hoping.
Side effects
- A role without the Booking System permission never gets overbooking, service editing or alerts, even if the default says on.
Limits and gotchas
- If someone says "I can't see Reports/Settings/Cash drawer", check their role first.
- Settings sections each need their own permission (see the Settings guide).